


Source : http://www.allianceprotectrice.fr/fichiers/PlanLotro.pdf
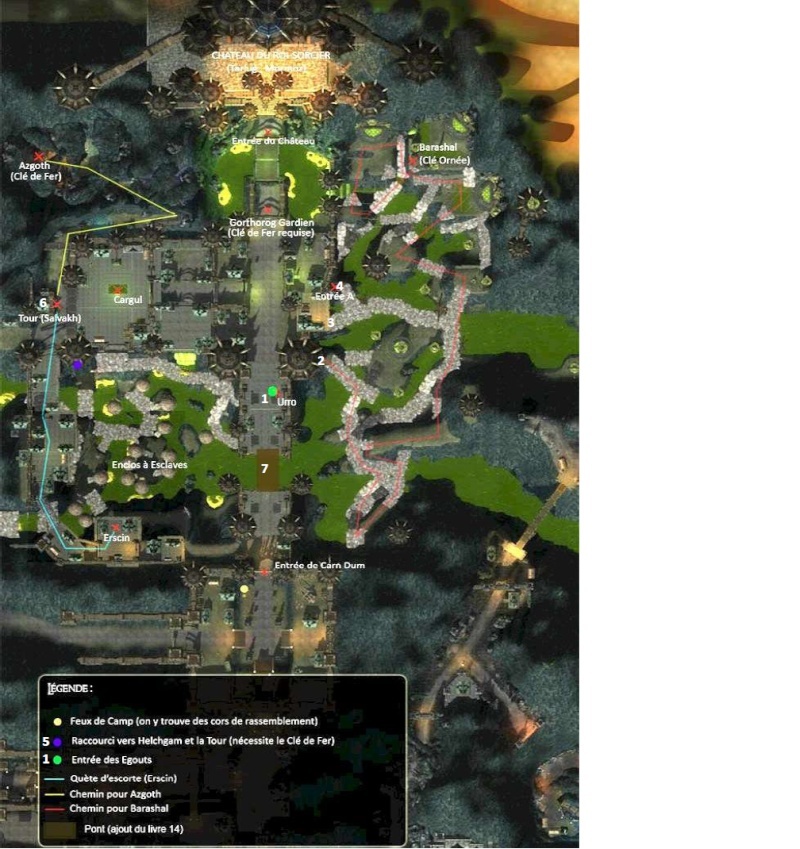
1 : Enclos aux esclaves conduit vers la carte : Egoûts de Carn Dûm - 1ère partie = vers le point 4 sur la carte suivante
2 : Barashal et la clef ornée conduit à Égouts de Carn Dûm : 1ère partie" = vers le point 5 sur la carte suivante
3 : Sortie vers Helchgam (sortie dans la ville pour retrouver les égoûts d'Helchgam)
4 : voir "Carn Dûm : Egoûts de Carn Dûm : Helchgam " = E1
5 : voir "Carn Dûm : Egoûts de Carn Dûm : Helchgam " = E2
6 : voir "Carn Dûm : Egoûts de Carn Dûm : Helchgam " = E3
7 : Pont
-------------------------------------------------------------------------------------------------------------------------

Attention
1. NE JAMAIS SAUTER dans l'eau verte .. votre mort sera instantanée
2. Soyez très prudent en combattant les trolls. Vous serez sur sur des bords assez élevés et ils ont tendance à vous faire sauter en arrière (vers l'eau verte et une mort immédiate) et vous serez trop loin pour être rez.
3. Faites attentions aux trous dans les passages supérieurs le long des parois. Ils sont à dimension humaine et vous risquez de tomber à travers, ce qui entrainera votre mort immédiate et vous devrez recommencer l'instance.
Objets de quête de classe 45: les objets étant liés prenez garde à ce que les dés ne soient lancés que par les classes concernées. (je dois rajouter Sentinelle et GDR)
- Corrosive Droplets (Leeches): Ménestrel
- Rune of Winged Dominance (Mormoz): Ménestrel, Chasseur
- Ashen Gorthorog Horn (Tarlug) : Ménestrel
- Crimson Gorthorog Horn (Barashal): Gardien
- Putrid Slime of Helchgam (Helchgam): Maitre du Savoir, Chasseur, Capitaine
- Rune of Evil Presence (Salvakh): Maitre du Savoir
- Medallion of Passage (Any Uruk): Chasseur, Capitaine
- Cruel Talon of Azgoth (Azgoth): Cambrioleur
Quêtes
- Heart of the Waters (requires completion of Foul Waters, Further
Upstream, Discovering Source quest chain)
- Lifting the Yoke
- The Strongest Back (requires completion of Lifting the Yoke)
- Lord of the Gertheryg (requires completion of Into the Arena, Champion
of the Arena, Master of the Arena, The Northern Cousin, Moving
Mountains quest chain)
- Queen of the Host (Requires completion of The Winged Host)
L'entrée se situe à l'Ouest d'Urugarth. Pour vous rendre soit à Carn Dum soit à Urugarth, vous devrez commencer au Nord d'Himbar et vous diriger vers l'Ouest au travers des Gates
of Shadow. Vous avez un feu de camp à l'extérieur des 2 villes, que ce soit Urugarth ou bien Carn Dum
(1) Entrée vers Urugarth et feu de camp vers lequel les chasseurs peuvent vous téléporter (s'il y sont liés).
(2) Entrée vers Carn Dum et feu de camp vers lequel les chasseurs peuvent vous téléporter (s'il y
sont liés)
(3) Slaves for quest "Lifting the Yoke". The slaves are tied to
polls inside the round tan huts. Before opening the door make sure to
clear the area around the hut. Also, ALWAYS have your tank open the door
to capture agro. A mob of several normal creatures and one or two
elites will attack you once the door is opened. Make sure that everyone
clicks on a slave at the same time to ensure that everyone gets credit
for the slaves.
(G1) Iron Gate - Shortcut Past Helchgam
(4) Entrance to the Carn Dum Sewers. (MAP)
Once in the leech cave you will quickly come across a platform that has a
row of Horn Blowers on either side. DO NOT ENGAGE THEM. The Horn
Blowers will start calling in allys when players come near.
With the tank leading the way the entire group should run past them at
once, angling to the right until you hit a door. STOP and fight any of
the mobs that the hornblowers call (usually between one and six).
(5) Exit to the Carn Dum (right fork)
This exit will lead to Barashal, a Nemisis-Gorthorog Troll that drops
the Ornate Grate Key. WARNING! Be careful to always be lined up
so a troll knock back will not knock you into the water.
Head straight on the path and take the first right. Follow the path
around to the left until you start heading north and up again. You will
know when you are on the right path because you will have to jump down a
small black ledge. This path will guide you around the right side of
Carn Dum till you reach an area where you start facing Elite-Master
Trolls with two clubs.
NOTE! You must engage the trolls with two clubs that are pounding on the
bridges quickly. They will knock the bridges down if allowed to pound
for long enough, causing you to detour the long way around. Fight you
way through them until you reach Barashal.
(6) Barashal
- Drops Crimson Gorthorog Horn, Ornate Gate Key to gate that leads to
Helchgam through the left fork in the Leech cave
Once he's defeated and you have the Ornate Gate Key go back the way you
came. There is a ledge that you jumped down from that you can jump back
up if you work at it. There is a small cut in the ledge that you can
gain purchase on. Go back to the leech cave and angle to the right again
toward the left fork
(7) and Helchgam. (Ornate Gate Key Required)
8 Map of Helchgam's Lair
Helchgam: (Picture) (Special Thanks to Retsha for teaching me this)
Drops: Lvl 45 Quest Item, Putrid Slime of Helchgam (Hunters, Captain,
Loremaster)
Reaching Helchgam: The entrance to Helchgam's area is though the Leech
cave. You will take a left at the fork past the horn blowers to a gate
(key needed).
Helchgam is a large squid type creature much like what attacked the
fellowship outside of Moria. You will fight your way through several
Morroval to reach him. When you reach two elite-master Morroval you will
be right in the room where he is located. There will be a cliff at the
second elite-master Morroval, you will need to jump off of this cliff to
start the battle with Helchgam. (Pets and Heralds will not be able to
follow)
Tactics
WARNING! Do not engage Helchgam until the very end of the battle.
Helchgam will periodically hit your party with an approximately 300
point damage and -115 agi poison, but ignore him for now. Read below for
more information.
The room where you fight Helchgam is a circular room with seven pillars
running in a counter-clockwise direction from you. When the battle
starts you will be fighting four tentacles at the first pillar. Engage
them...the two on the left of the pillar first, then the two on the
right of the pillar. Once you've killed the tentacles Helchgam will pull
the first pillar down. After awhile Helchgam will destroy the pillar,
pulling it into the green water (and anyone standing on it). Once he
pulls down the seventh pillar he will leave that one floating until he
dies.
You will continue this pattern through all seven pillars. Again, DO NOT
ATTACK Helchgam, EVEN FROM A DISTANCE, until you have defeated the last
pillars tentacles. All it does is cause him to regen and attack you
more.
Helchgam himself is very easy to defeat. Once you've reached the last
pillar have your melee people run to the edge of it and engage him while
the ranged combat attack from a distance.
NOTE: If you need a rest for power regen, just have the party hide
behind a pillar once you've defeated the tentacles at the pillar until
everyone is ready for the next battle. You will be in combat mode, so
the regen will take awhile (a good time for a bio break)
(9) Tower with Elite Boss - Salvakh
DROPS: Rune of Evil Presence
The gate next to Salvakh will not drop until Salvakh has been defeated,
who is in the last room of the tower hallway on the right. There are two
other rooms on the right with Angarim that cannot be engaged and one on
the left with pale folk in it.
Before going near Salvakh engage and kill the pale folk in the room
across from him. This will enable you to engage and kill the Angarim in
the first two rooms. Once the area is clear have someone go close to
Salvakh to start the battle. He is like a silk spinner and will summon
spiders, and cannot be mezzed or stunned.
(10) QUEST: The Strongest Back (Escort Quest) (Pink Line)
Before talking with Erscin make sure to clear everything out of the area
leading to him, including around him. This will help prevent adds from
attacking. When you talk to Erscin an escort quest will start, spawing a
few dozen sleeping Gorogoth. The quest bugged on us last time we did
it, but you should be able to just put everyone on auto-follow and
follow him out without ever having to fight again. (good time for a bio
break)
(11) Azgoth (Nemesis) (Blue Line)
Drops: Iron Gate Key, Cruel Talon of Azgoth (Burgular)
Azgoth is the only Morroval close to her that can be engaged. Be careful
to not pull her past the small pull with the skulls around it as she
will reset if anyone runs past that area.
DEFEATING AZGOTH: The key to Azgoth is to take her down quickly. Have
everyone stand in a close pile around her attacking. She will keep
summoning more Morroval, so stay in a tight pack with the guardian
spamming area effect taunts. CHAMPIONS: Use your clobber skill as it
interrupts her summoning adds.
All other classes should use their AOE spells whenever new spawns
appear. The recommended fellowship move is RRRRRG or RRRRRB to do quick
damage and receive a heal over time or power. Do not bother with doing
yellow fellowship moves as she disappears periodically during the fight
canceling any buffs on her.
(12) Cargul (Elite-Master) (Yellow Line)
The Cargul is surrounded by several high priest that can't be attacked.
When you get close they will start praying to the Cargul. Pull each one
individually from a distance. They will spawn a few pale folk to fight
with them. Once all the priest are dead the Cargul will attack.
Follow the yellow line around to the castle. You can avoid almost every
fight by just staying along the walls until your on the path heading due
north, then just staying on the left all the way to the wall.
There are two Gorhorog's walking down the center path. Kill both of
these and you can have a clear, wide path all the way to the gate of the
castle.
WARNING!: There are several hidden horn-blowers along the way. Keep your
eye open for them and take them down quickly.


1 : Enclos aux esclaves conduit vers la carte : Egoûts de Carn Dûm - 1ère partie = vers le point 4 sur la carte suivante
2 : Barashal et la clef ornée conduit à Égouts de Carn Dûm : 1ère partie" = vers le point 5 sur la carte suivante
3 : Sortie vers Helchgam (sortie dans la ville pour retrouver les égoûts d'Helchgam)
4 : voir "Carn Dûm : Egoûts de Carn Dûm : Helchgam " = E1
5 : voir "Carn Dûm : Egoûts de Carn Dûm : Helchgam " = E2
6 : voir "Carn Dûm : Egoûts de Carn Dûm : Helchgam " = E3
7 : Pont
-------------------------------------------------------------------------------------------------------------------------
Attention
1. NE JAMAIS SAUTER dans l'eau verte .. votre mort sera instantanée
2. Soyez très prudent en combattant les trolls. Vous serez sur sur des bords assez élevés et ils ont tendance à vous faire sauter en arrière (vers l'eau verte et une mort immédiate) et vous serez trop loin pour être rez.
3. Faites attentions aux trous dans les passages supérieurs le long des parois. Ils sont à dimension humaine et vous risquez de tomber à travers, ce qui entrainera votre mort immédiate et vous devrez recommencer l'instance.
Objets de quête de classe 45: les objets étant liés prenez garde à ce que les dés ne soient lancés que par les classes concernées. (je dois rajouter Sentinelle et GDR)
- Corrosive Droplets (Leeches): Ménestrel
- Rune of Winged Dominance (Mormoz): Ménestrel, Chasseur
- Ashen Gorthorog Horn (Tarlug) : Ménestrel
- Crimson Gorthorog Horn (Barashal): Gardien
- Putrid Slime of Helchgam (Helchgam): Maitre du Savoir, Chasseur, Capitaine
- Rune of Evil Presence (Salvakh): Maitre du Savoir
- Medallion of Passage (Any Uruk): Chasseur, Capitaine
- Cruel Talon of Azgoth (Azgoth): Cambrioleur
Quêtes
- Heart of the Waters (requires completion of Foul Waters, Further
Upstream, Discovering Source quest chain)
- Lifting the Yoke
- The Strongest Back (requires completion of Lifting the Yoke)
- Lord of the Gertheryg (requires completion of Into the Arena, Champion
of the Arena, Master of the Arena, The Northern Cousin, Moving
Mountains quest chain)
- Queen of the Host (Requires completion of The Winged Host)
L'entrée se situe à l'Ouest d'Urugarth. Pour vous rendre soit à Carn Dum soit à Urugarth, vous devrez commencer au Nord d'Himbar et vous diriger vers l'Ouest au travers des Gates
of Shadow. Vous avez un feu de camp à l'extérieur des 2 villes, que ce soit Urugarth ou bien Carn Dum
(1) Entrée vers Urugarth et feu de camp vers lequel les chasseurs peuvent vous téléporter (s'il y sont liés).
(2) Entrée vers Carn Dum et feu de camp vers lequel les chasseurs peuvent vous téléporter (s'il y
sont liés)
(3) Slaves for quest "Lifting the Yoke". The slaves are tied to
polls inside the round tan huts. Before opening the door make sure to
clear the area around the hut. Also, ALWAYS have your tank open the door
to capture agro. A mob of several normal creatures and one or two
elites will attack you once the door is opened. Make sure that everyone
clicks on a slave at the same time to ensure that everyone gets credit
for the slaves.
(G1) Iron Gate - Shortcut Past Helchgam
(4) Entrance to the Carn Dum Sewers. (MAP)
Once in the leech cave you will quickly come across a platform that has a
row of Horn Blowers on either side. DO NOT ENGAGE THEM. The Horn
Blowers will start calling in allys when players come near.
With the tank leading the way the entire group should run past them at
once, angling to the right until you hit a door. STOP and fight any of
the mobs that the hornblowers call (usually between one and six).
(5) Exit to the Carn Dum (right fork)
This exit will lead to Barashal, a Nemisis-Gorthorog Troll that drops
the Ornate Grate Key. WARNING! Be careful to always be lined up
so a troll knock back will not knock you into the water.
Head straight on the path and take the first right. Follow the path
around to the left until you start heading north and up again. You will
know when you are on the right path because you will have to jump down a
small black ledge. This path will guide you around the right side of
Carn Dum till you reach an area where you start facing Elite-Master
Trolls with two clubs.
NOTE! You must engage the trolls with two clubs that are pounding on the
bridges quickly. They will knock the bridges down if allowed to pound
for long enough, causing you to detour the long way around. Fight you
way through them until you reach Barashal.
(6) Barashal
- Drops Crimson Gorthorog Horn, Ornate Gate Key to gate that leads to
Helchgam through the left fork in the Leech cave
Once he's defeated and you have the Ornate Gate Key go back the way you
came. There is a ledge that you jumped down from that you can jump back
up if you work at it. There is a small cut in the ledge that you can
gain purchase on. Go back to the leech cave and angle to the right again
toward the left fork
(7) and Helchgam. (Ornate Gate Key Required)
8 Map of Helchgam's Lair
Helchgam: (Picture) (Special Thanks to Retsha for teaching me this)
Drops: Lvl 45 Quest Item, Putrid Slime of Helchgam (Hunters, Captain,
Loremaster)
Reaching Helchgam: The entrance to Helchgam's area is though the Leech
cave. You will take a left at the fork past the horn blowers to a gate
(key needed).
Helchgam is a large squid type creature much like what attacked the
fellowship outside of Moria. You will fight your way through several
Morroval to reach him. When you reach two elite-master Morroval you will
be right in the room where he is located. There will be a cliff at the
second elite-master Morroval, you will need to jump off of this cliff to
start the battle with Helchgam. (Pets and Heralds will not be able to
follow)
Tactics
WARNING! Do not engage Helchgam until the very end of the battle.
Helchgam will periodically hit your party with an approximately 300
point damage and -115 agi poison, but ignore him for now. Read below for
more information.
The room where you fight Helchgam is a circular room with seven pillars
running in a counter-clockwise direction from you. When the battle
starts you will be fighting four tentacles at the first pillar. Engage
them...the two on the left of the pillar first, then the two on the
right of the pillar. Once you've killed the tentacles Helchgam will pull
the first pillar down. After awhile Helchgam will destroy the pillar,
pulling it into the green water (and anyone standing on it). Once he
pulls down the seventh pillar he will leave that one floating until he
dies.
You will continue this pattern through all seven pillars. Again, DO NOT
ATTACK Helchgam, EVEN FROM A DISTANCE, until you have defeated the last
pillars tentacles. All it does is cause him to regen and attack you
more.
Helchgam himself is very easy to defeat. Once you've reached the last
pillar have your melee people run to the edge of it and engage him while
the ranged combat attack from a distance.
NOTE: If you need a rest for power regen, just have the party hide
behind a pillar once you've defeated the tentacles at the pillar until
everyone is ready for the next battle. You will be in combat mode, so
the regen will take awhile (a good time for a bio break)
(9) Tower with Elite Boss - Salvakh
DROPS: Rune of Evil Presence
The gate next to Salvakh will not drop until Salvakh has been defeated,
who is in the last room of the tower hallway on the right. There are two
other rooms on the right with Angarim that cannot be engaged and one on
the left with pale folk in it.
Before going near Salvakh engage and kill the pale folk in the room
across from him. This will enable you to engage and kill the Angarim in
the first two rooms. Once the area is clear have someone go close to
Salvakh to start the battle. He is like a silk spinner and will summon
spiders, and cannot be mezzed or stunned.
(10) QUEST: The Strongest Back (Escort Quest) (Pink Line)
Before talking with Erscin make sure to clear everything out of the area
leading to him, including around him. This will help prevent adds from
attacking. When you talk to Erscin an escort quest will start, spawing a
few dozen sleeping Gorogoth. The quest bugged on us last time we did
it, but you should be able to just put everyone on auto-follow and
follow him out without ever having to fight again. (good time for a bio
break)
(11) Azgoth (Nemesis) (Blue Line)
Drops: Iron Gate Key, Cruel Talon of Azgoth (Burgular)
Azgoth is the only Morroval close to her that can be engaged. Be careful
to not pull her past the small pull with the skulls around it as she
will reset if anyone runs past that area.
DEFEATING AZGOTH: The key to Azgoth is to take her down quickly. Have
everyone stand in a close pile around her attacking. She will keep
summoning more Morroval, so stay in a tight pack with the guardian
spamming area effect taunts. CHAMPIONS: Use your clobber skill as it
interrupts her summoning adds.
All other classes should use their AOE spells whenever new spawns
appear. The recommended fellowship move is RRRRRG or RRRRRB to do quick
damage and receive a heal over time or power. Do not bother with doing
yellow fellowship moves as she disappears periodically during the fight
canceling any buffs on her.
(12) Cargul (Elite-Master) (Yellow Line)
The Cargul is surrounded by several high priest that can't be attacked.
When you get close they will start praying to the Cargul. Pull each one
individually from a distance. They will spawn a few pale folk to fight
with them. Once all the priest are dead the Cargul will attack.
Follow the yellow line around to the castle. You can avoid almost every
fight by just staying along the walls until your on the path heading due
north, then just staying on the left all the way to the wall.
There are two Gorhorog's walking down the center path. Kill both of
these and you can have a clear, wide path all the way to the gate of the
castle.
WARNING!: There are several hidden horn-blowers along the way. Keep your
eye open for them and take them down quickly.
Dernière édition par Sindarella le Mer 10 Mar - 11:57, édité 5 fois


 )
)